I am new to sharepoint, did not even know it existed last month. My boss would like me to create a sharepoint list with multiple tasks/jobs, with a field to assign those tasks to certain people. Then she would like jobs to be completed sequentially. For example: Bill gets an email to get a bucket, when he clicks complete, Josh gets an email to fill it with water, etc. What is the best way to do this?
2 Answers
Create a custom list with status fields and people pickers for each "task". Then use SharePoint designer to handle the validation logic an email sending for your workflow. I also create a choice field to act as a switch to change from no to yes when the email is sent. After each email I have the workflow set the email sent status to yes. This also helps the users know how far along the process is and what emails were sent.
Basics:
Columns:
- Task A Stats (Choice: Incomplete, Complete)
- Person A (people picker for email)
- Email A Sent (Choice: Yes, No)
(repeat fields for as many times as you need)
Workflow:
- IF Person A is not empty
- AND task A status is Incomplete
- AND Email A Sent is NO
- Then send Task A Email (to person A)
- AND set Email A Sent to Yes.
(repeat logic as needed)
This is just one way to do it as you can customize the list and workflow to meet any other requirements that I may have missed.
This is called a workflow, you can create a workflows with more than one way, as in your case i'd suggest using the Approval – SharePoint 2010 workflow which already included in SharePoint and you can apply it in your list or library by following the below instructions.
Follow these steps:
Open the list or library for which you want to add the workflow.
On the ribbon, click the
List or Library tab. Note: The name of the tab can vary with the type of list or library. For example, in a calendar list the tab is named Calendar.- In the Settings group, click
Workflow Settings. - On the
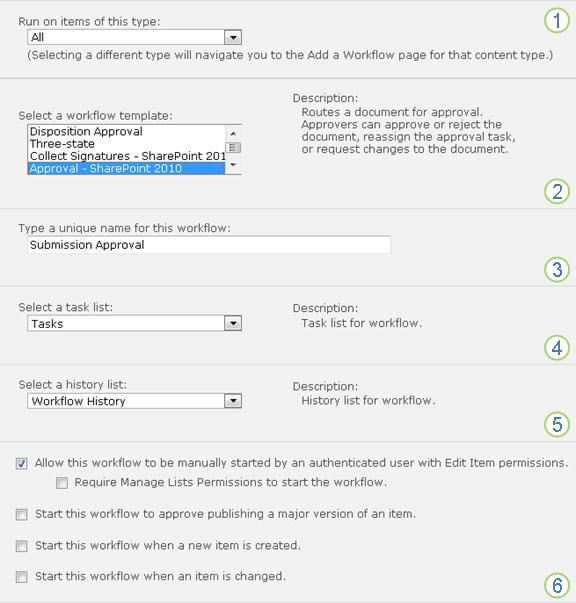
Workflow Settingspage, under Show workflow associations of this type, specify if you want the workflow to run on the document, list, or a folder and then clickAdd a workflow. - Complete the first page of the association form.

1. Content type
Keep the default selection as All, or select a specific content type.
2. Template
Select the Approval – SharePoint 2010 template. Note: If the Approval – SharePoint 2010 template doesn’t appear in the list, check this link for how to enable it.
3. Name
Type a name for this workflow. The name will identify this workflow to users of this list or library.
4. Task List
Select a task list to use with this workflow. You can select an existing task list or click New task list to have a new list created.
5. History List
Select a history list to use with this workflow. You can select an existing history list or click Workflow History (new) to have a new list created.
6. Start Options
Specify the way or ways in which this workflow can be started.
6. When all of the settings in this form are the way you want them,
click Next.
7. Complete the second page of the association form.
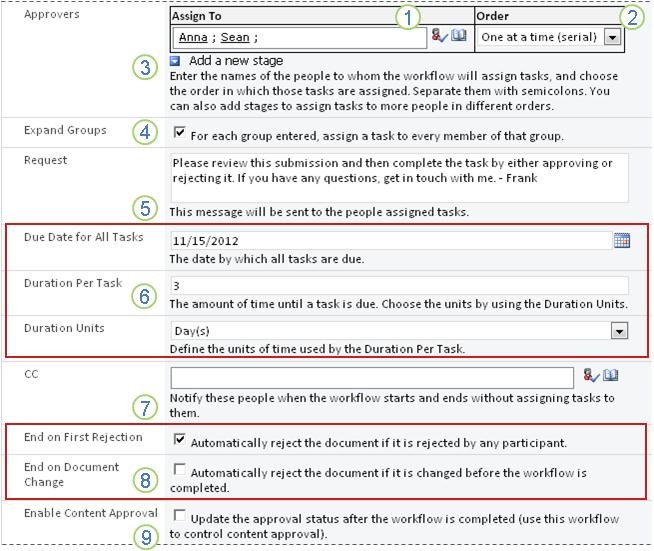
Note: SharePoint products presents you with the first several options in this second page of the association form — numbers one through seven in the following illustration, from Approvers through CC — each time that you start the workflow manually, so that you can make changes to those options for just that one instance.
1. Assign to
Enter names or addressed for the people you want the workflow to assign tasks to.
If the tasks will be assigned one at a time (in serial) Enter the names or addresses in the order in which the tasks should be
assigned.If all of the tasks will be assigned at the same time (in parallel) The order of the names or addresses doesn’t matter.
2.Order
Specify whether the tasks should be assigned one at a time (in serial) or all at once (in parallel).
3.Add a new stage
Add any stages that you want beyond the first one that you’ve just configured.
- To delete an entire stage, click in the Assign To field for that stage, and then press CTRL+DELETE.
4.Expand groups
To have one task assigned to each member of each group that you enter in the Assign to field, select this check box. (Each member of the group will receive a task notification, and each member will have his or her own task to complete.)
To have only one task assigned to each entire group that you enter in the Assign to field, clear this check box. (Each member of the group will receive a task notification, but any one member can claim and complete the single task on behalf of the whole group.
5.Request
Any text that you include here will be included in each task notification that the workflow sends. Don’t forget to include any additional instructions or resources that participants might need, including:
Contact information.
If appropriate, a note about single tasks assigned to entire groups or distribution lists.
6.Due dates and task duration
Specify a final due date for the entire workflow, and/or specify the number of days, weeks, or months allowed for the completion of each task from the time when it’s assigned.
- If this workflow will ever start automatically, it’s usually a good idea to leave the Due Date for All Tasks field empty and to use the two duration fields to control the due date. You can always supply a precise due date in the initiation form if and when you start the workflow manually.
7.CC
Enter the names or email addresses anyone of who should be notified each time the workflow starts or ends.
Entering a name here doesn’t result in the assignment of a workflow task.
When the workflow is started manually, the person who starts it receives the start and stop notifications without needing to be specified in this field.
When the workflow is started automatically, the person who originally added it receives the start and stop notifications without needing to be specified in this field.
8.Ending the workflow
Select neither, either, or both of these options.
9.Enable content approval
Select this check box if you will be using this workflow to manage content approval.
When you have all of the settings in this page the way you want them, click Save to create the workflow.

